Category Archives: Furniture Redo

Featured Technique

Good morning!

I recently shared with you a chair makeover in a french inspired paint finish.  Based on the feedback, which I sooo appreciate, I completed some other pieces.

Before with primer

It isn’t necessary to prime first, but I wasn’t sure which direction I was heading with this table.  So, the legs got primed.

With it’s first coat.

Blue

Finished

Over the blue went gray, then a light sanding and a stain.

All done

I sanded the top and stained it with dark walnut.  I will put a wax finish on top, then it’s out the door!

But it is NOT going to the store!

This coming week is Spring Break!  I will be taking a break too.  When I return in April, I have MANY, MANY exciting things to share! 

1) I will look different

2) I will share exactly where this table and many other pieces are going!

Thanks for following along!  Have a great week.

XO-


A Thrifty Weekend


Hi All,

It is amazing where this hobby/business has taken me in such a short time!  I am branching out and trying new things weekly.  And surprising even myself!

Another bonus to all of this, are the people I meet.  I had a “girl date” (as my hubby calls it) on Saturday morning with a fellow blogger! 

Kimm of Reinvented is a true blogger!  She has been working it for a few years, has traveled to Blissdom, has advertisers and an amazing following.  The beauty is she lives in the same town that I do!  Small world, since I have been a follower for some time now!

Our date took us to the flea market!  We were both newbies, but had no trouble navigating our way.  We each scored some treasures and the creative juices were flowing.  I love that Kimm is right here in town and loves the same stuff I do.  I hope to thrift with her again soon.  Be sure to check out her blog, she is quite creative!

I promise to share pics of my thrifty finds, but right now I need to show you my french inspired chair.

I got the chair at an auction.  It had no seat, but Hubby made me a wood one.

Before

Following a technique that Miss Mustard Seed has perfected, I painted the whole chair with a funky blue.  It was an oops paint from HD.

Brushed Blue

I did not sand or prime it, just painted.  Next, using 80 grit sandpaper, I roughed it up a bit.

Roughed up

Then came a gray paint – another oops color.

Dry brush gray over the blue

I have to say, I was liking it at this stage. But, I sanded even more.  I was going for the distressed look.

and


To tie it all together, I applied a stain to the entire chair, wiping it off with a paper towel as I went.

With stain

For the seat, I used 3 inch thick foam, covered in Duck cloth.

All done

The cushion is so comfortable!

look how thick!

I hope you like it, as much as I do!  I believe this is a keeper for now!

Tell me what you think about this new technique.

Thanks for stopping!

XO-

Photobucket


Before and After Rolling Cart

Hi All,

I have a before and after to share.  This rolling cart came home with me a few weeks ago.

Before


Before

A couple of coats of SW Creamy White, some dark gray textured vinyl-type fabric and some Oil Rubbed Bronze paint on the wheels, and now she is ready for spring!

Ta-da

Pretty

I love this new look.  It would make a great bar on the patio this summer or even a plant potting cart.

As you can see from the pictures, she is already at the store.  I will have some booth updates tomorrow.  Fortunately, some items have found a new home, so a mini makeover was necessary.

Have a great day and make mine by leaving a comment!

XO-

PhotobucketDomestically Speaking


A Table Reveal

Hi All,

I am excited to share a finished makeover! 

First, I found this table at a thrift store.  I had to fight for it, it was a coveted item.

The top was recently stained and varnished but the base was a bit rough.

Brown legs, before.

Sorry for the shot, it was already in the paint booth.

Great detail

I love the detail of the legs but the brown paint was not doing them justice.

A light coat of Creamy White

Some distressing (of course) and a light stain.

Stained

The entire base received a light coat of white.

Done?

Thought I was done, but decided I was not a fan.  The finish was too blotchy.  So, I dry brushed the base with the Creamy White.

Now Complete!

In place

Yes, I said it – in place.  The table is behind the sofa in the living room.  So for now, I believe it’s a keeper.

You like?  Leave a comment!

TGIF!  I am linking up to my fav: Furniture Feature Fridays

XO-


A Table and Footstool

Hi All,

Everyone loves before and after shots.  Well, I have just a few.  I have tons of pics of in-progress shots, but those are not as fun!

Craft gone wrong

I scored this baby while thrifting.  I looked beyond the stamped leaves and thought a fresh coat of white would do her good.

Nice and smooth

No signs of leaves!  After it was sanded, it received 2 coats of SW Creamy White.  Then it was lightly distressed with a sanding block.

Lightly distressed

All done.

Complete

I am a sucker for a footstool.

Beat up

With a fresh coat of paint and a new coffee sack.

Costa Rica coffee sack

And.

Some distressing

Are you catching the theme?  Distress everything!

Going to the store

Thanks for stopping.  Love to hear from you!

Going to:

Transformation Thursdayand The Shabby Nest

XO-


Old Bench

Hi again,

Donna over at Funky Junk Interiors is having a party featuring benches.  Since I have one that I love, I thought I would link up.

I got this baby at a barn auction.  It is the real deal.   I applied a protective coating but other than that, I left her alone.

Here she is in all her glory:

In the store

Since it is in the store I cannot take more or better pictures.  You get the idea though.

Authentic farm bench

Beautiful!

This is very cool!

New here?  Follow along by email.  Simply input your email on the home page and you will receive updates.  Thanks for stopping!

Partying over at

Funky Junk's Saturday Nite Special

XO-


Work in Progress

Hope you all had a great weekend!

We were busy with the usual stuff and I spent some time with my paint gun.  It took a while to get back in there for many reasons, but one I will share.  We are working on a table and chair set.  We opted to paint the table top black.  Because black paint is 30% color, it takes forever to dry.  We tried a new product that promised to cure faster.  At a contractor rate of $56/gallon, we were expecting perfection.  Not so much.

First it would spray, then stop.  This happened twice.  Mind you it takes roughly 1/2 an hour to clean the components and set back up, so we were not happy.  Then I got the blame because it must have been my fault for not cleaning the sprayer correctly.

We trecked back to the store.  After consulting the experts, were told that the paint was drying too quickly in the gun and to add water.  Not fixed.  Same thing happened. 

We gave up and rolled it.  We were not happy! 

Just for the record, the sprayer was perfectly clean!

Needless to say, we fell far behind on production.

So I worked like a mad woman trying to catch up.  While not much is complete, here are a few projects in progress.

Before & After Paint

Original was yellow with speckles

Back

I painted and distressed the chairs.  I glazed each one by hand.  Then came the decision for fabric.  I was going neutral, after all I plan to sell this set.  After a trip to the fabric store, I opted for this.

2 of 4 complete

Fabric

Distressed

There are 4 chairs and an oval table.  I think the set will look sharp with this fabric!

Just for the record, I used my new air powered staple gun!  Louve this baby.  The only hiccup was the stripes!  Keeping it all straight was a challenge.  But totally worth it.  I am thrilled with the fabric!

Let me know your thoughts.  New here?  Follow by email.  Simply go to the home page and input your email and start following today! 

XO-


All done…again

Is anything ever really finished?

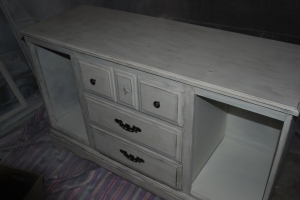
You can find the original post here.  I thought it was all done.  However, I struck out finding baskets for the two open spots.  The baskets I did find were pricey and ended up not fitting the opening.  Solution?

Thanks to CA, I distressed the shutter doors, glazed them and on they went.  CA found similar pieces in Pottery Barn and Ballard catalogs, so I took this option and ran with it.  I am so glad I did.

Fresh coats of paint

Two openings

No doors, in my home

Wish I could keep her, she looks awfully nice in the house!

Done and in the store

Looking for a new home

I did think about the perfect place for her in my home.  Oh well, hopefully she will find a new place soon.

As always, your comments are appreciated!

XO-


Piece de Resistance

Good morning!

It’s been a busy and productive week.  I am anxious to share a piece that I just completed. 

You may recall that I scored this baby for a steal.  It was in pretty bad shape, so restoring it was not part of the vision.

Before

It is a Lane Cedar Chest.

Cedar lined trunk

It has beautiful legs.

Showing off the legs

Let the makeover begin.

First off, I sanded the top completely.

Top - in bad shape

Sanded

I decided to stain the top in Dark Walnut.

Then, this baby received primer and paint.

Painted

I love the contrast of the top and the painted portion.

Almost done

Why stop there?

A little sanding on the edges.

Sanded and stained

Rather than using my regular glaze, I used the Dark Walnut stain to highlight the detail and imperfections she has.

Love the detail

Light stain

And here she is:

All done

The bottom part is a drawer.  I sprayed the original hardware, since it’s still wet, you will have to imagine them in place!

Complete

Thanks for indulging me as I pack this post with pictures!  What do you think?  Love to hear your thoughts!

Linking to one of my fav’s: http://missmustardseed.blogspot.com/

XO-


Vintage Restyled restocked

Good morning,

These posts are getting farther apart.  Life has gotten in the way the last few days.  I shared some photos of the store when we opened on February 3 and since then it has gone through a few changes.  All good of course, but when a larger item sells all the stuff placed on top of that item ends up on the floor or on other items. So let me share some photos.

Opening Day

Day 2

The desk sold, so we replaced it with the bench and added some stools and smalls.  The black table on the right was a hot item and went to a new home.

1 week

The table sold and so did the bench!  So, we restocked!

New items on 2/9

A little love for Valentine’s.

More changes

More red for V-day

But that sold too.

Updated on 2/14

Media cabinet with shutter doors on

You may recall my previous post where I was searching for baskets for this cabinet.  CA had a great idea and saw cabinets with shutter doors in Ballard and Pottery Barn, so if it’s good enough for them, then good enough for me!

Marble top end table and stool

Coffee table that required NO work!

Some more items.

Kids table and chairs

And here is a shot on February 14.

Vintage Restyled

I included a lot of pictures for my gal Ra, who loves to see everything.  She also always comments!  Which I LOVE!

Now it’s your turn to comment!  Please share your thoughts and suggestions.

Have a great Wednesday!

XO-